|
PHOTOGRAPHY
TOPICS
|
||
|
|
|
|
|
How
to Photograph Birds in an Acrylic Aviary (cont)
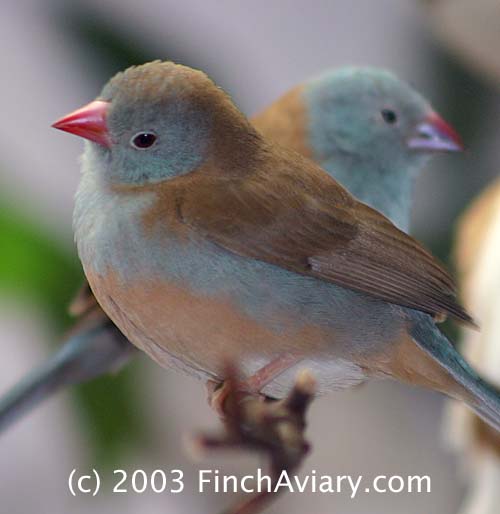
APERTURE (1) In general, when shooting birds, you want to use a wide aperture, or lens opening (see the side bar). The reason for this is that a wide aperture gives you a shallow depth of field. The bird will therefore stand out in focus with a soft, blurred background behind him, which is usually the desired effect. Using a wide aperture is usually not a problem, since indoor lighting is less than ideal and the wider the aperture, the more light comes in, and the better exposed your picture will be. Sometimes, however, I found that I get too shallow a depth of field, especially when working with a telephoto lens, which narrows depth of field even more. The bird I focused on will be in focus, but the bird right beside it would be out of focus. Sometimes this worked (I liked the effect in this photo of my blue caps), but other times it made the picture unusable, because the subject was really the pair of birds. In these cases, I have to make sure I narrow the aperture a little bit, so both birds appear sharp. When working with a narrow depth of field, the focus point (2) is exceptionally critical. I try to focus as close as possible on the eye of the bird, since this is the point that will draw you into the picture. If the eye is out of focus, the picture is usually unsatisfactory. (If taking a picture of a sleeping bird, focus on the beak instead.) The rest of the bird can fall out of focus somewhat, as long as the eye is sharp. I even sometimes blur the feathers of the bird in Photoshop because the picture is too sharp and the lines of the feathers stand out in an unnatural way. This tends to happen with my blue caps for some reason - they end up looking like they have bristly hairs, which is not the case.
SHUTTER SPEED (3)
Unfortunately, there is more to it than just aperture and depth of focus. There is also shutter speed and freezing motion. Birds move quickly - even their small movements while sitting perched are quite fast. In order to freeze the bird's motion, you must use a fast shutter speed. But how fast? Ideally, 1/250th of a second. That would be great. Except the indoor lighting in my house is not ideal and shooting for 1/250th of a second, even at a wide aperture, will result in a severely underexposed photograph. So a lot of compromises have to be made. With regard to shutter speed, I've found I can drop down to 1/60th of a second (sometimes even 1/30th). I get a lot of blurry pictures, but I take a lot of pictures, and I invariably get lucky on some. I delete most of them and keep the sharp ones or the ones I think I can work with. (This is a luxury of working digitally). ISO SENSITIVITY (4) Another compromise that can get you some faster shutter speeds is working with higher ISO settings (or using higher ISO film). My standard for shooting my birds is ISO 400, because on my camera it is the highest ISO setting that still does not produce distracting noise when viewed full size. However, if I need that extra boost, I will shoot 800 or even 1600. In these cases I use software to remove noise - Noise Ninja works well to remove noise without sacrificing image sharpness. Photoshop has some noise reduction capabilities, but they frequently lead to a blurry image. SOFTWARE IMPROVEMENTS (5) If you are working digitally, you can also shoot some underexposed pictures. If they are not underexposed too badly, software can greatly improve the image. I use Adobe Photoshop's Levels tool to do this and it works nicely on slightly underexposed images. FLASH Finally, there is flash. Flash is not ideal for photographing birds. For one thing, it will probably disrupt the birds somewhat (although I was very surprised to find that mine don't really react badly to it at all). For another, you will have to get close enough to the birds for the flash to reach them - and your presence will definitely disrupt them. While telephoto lenses are ideal for getting close up shots of birds without them being disturbed by the photographer, flash with a telephoto lens is pretty useless. Flash is also a somewhat unnatural and unflattering form of lighting, and it casts harsh shadows. Finally, flash will reflect in the Plexiglas panels and may ruin your shot. Although this is true, I've found that if I stand very close to the Plexiglas, the flash usually does not get in the way. When it does, it is usually only when I shoot at certain angles and I try to avoid those angles. Of course, if I am standing close to the Plexiglas, the birds are usually flying away, so it is a tricky situation. One thing about flash - if you see that it is adversely affecting your birds - don't use it. It is not worth stressing them out for - settle for a slower shutter speed or a higher ISO and/or hope that software might be able to compensate for the underexposure.
Click Previous to go back to the Introduction. Click Next to advance to Issues With Plexiglas |

 |
|
An example of shallow depth of field. Notice how the male strawberry is in focus but the other elements are softly blurred in the background.
|
 |
|
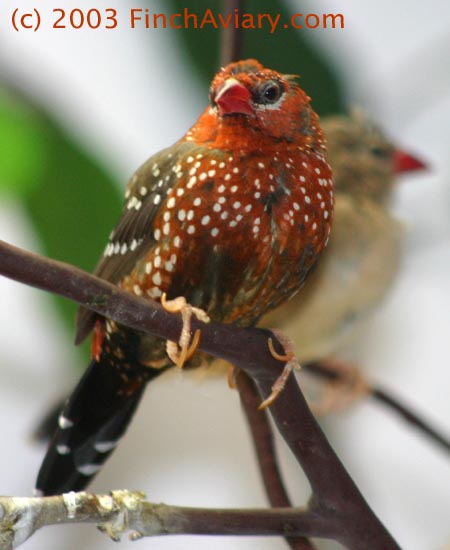
An example of large depth of field. Notice how all the birds and the leaves in the background are relatively sharp.
|
HOME | CONSTRUCTION
| CARE | BIRDS
| ACCESSORIES | BACKGROUND
AVICAM | GALLERY
| GUESTBOOK | LINKS
| SEARCH
SITE MAP | DISCLAIMER
| CONTACT US
(c)2004 FinchAviary.com