|
CONSTRUCTION
|
||
|
|
|
|
|
The Aviary Plans
Drawing
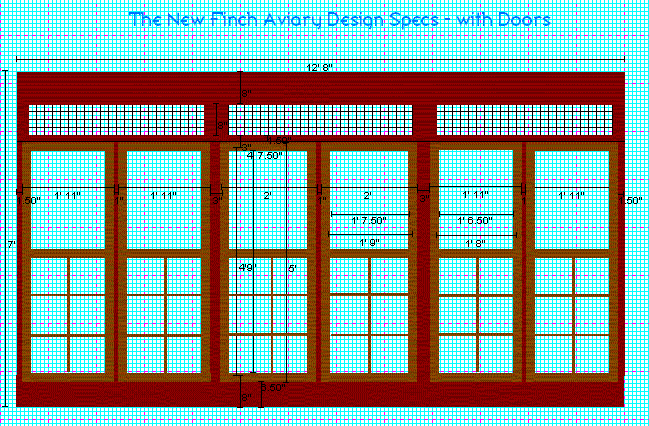
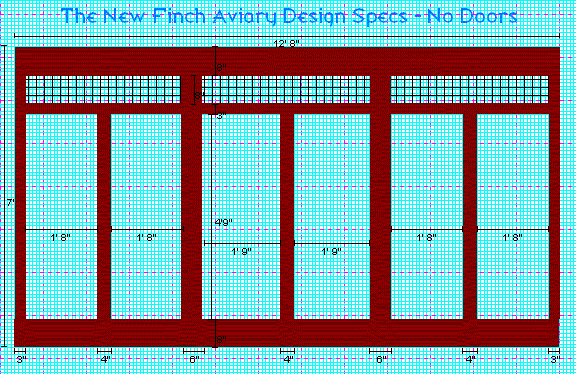
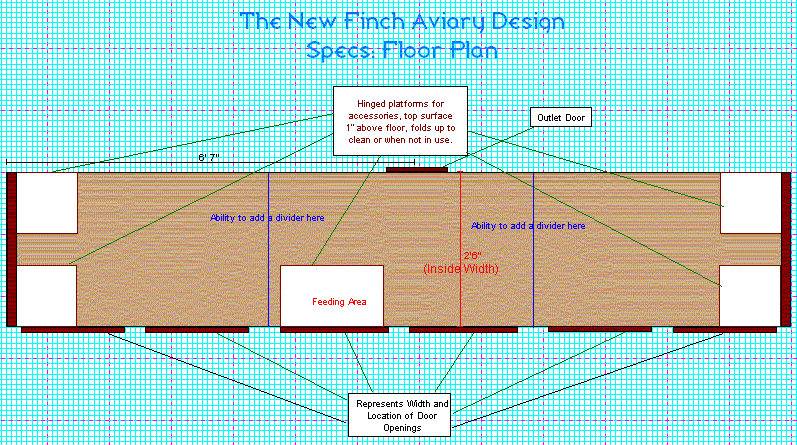
1A: New Finch Aviary Design: Aviary Front with Doors. Graphical Blue Prints | Dimensions | Door Locations | Outlet Door | Dividers | Shades | Fold-Down Platforms
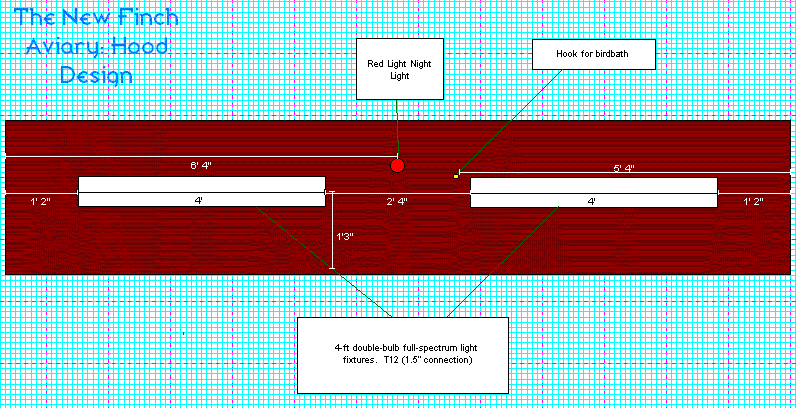
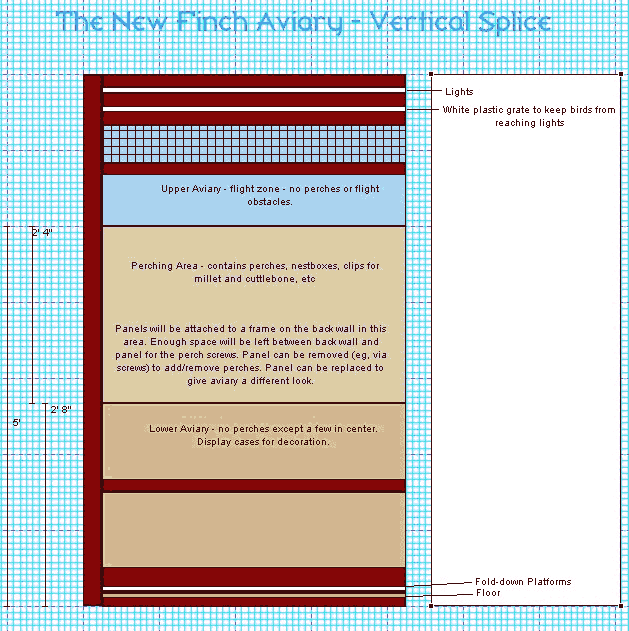
I started drawing my plans on graph paper. I found myself constantly erasing and throwing away drafts, then starting all over again. It was much more complicated to come up with a feasible design than I thought it would be – there were always issues of one sort or another. In the end, I decided to use software to architect the aviary. I wanted a tool that had the CAD capability of sizing components to the appropriate dimensions based on a scaling factor and to properly label the dimensions so my husband knew what to build. I didn’t want to spend money on a new tool or learn a complicated tool, so rather than use something like Visio that didn’t meet all of my requirements, I decided to write a quick-and-dirty design program. Because the actual drawings are rather large, to the left you find scaled down images that link to the plans. Click on a picture to bring up the details of the design. Note that because I work at high resolutions, even the enlarged plans have lost some detail in order to fit better on the screen at lower resolutions. Drawing 1A and Drawing 1B illustrate the front of the aviary, with and without doors attached. This front will be made of oak and stained red oak to match our living room decor. Drawing 2 illustrates the floor plan of the aviary, detailing the original intended locations of the fold-down platforms that will support the aviary accessories. When the aviary was actually built, the locations of the platforms were moved around abit. Drawing 3 illustrates the hood design, including full-spectrum lighting, night lights, and ceramic heat lamps when additional warmth may be needed. NOTE: In the end, we did not install the ceramic heat lamps or the red light night light because of concerns they would run too hot and be a fire hazard. Instead we plugged night lights into wall outlets outside the aviary and use a radiator-style oil-filled space heater outside the aviary when it is a little cool in the house. Drawing 4 illustrates a vertical splice indicating at what height various elements of the aviary will be. The first generation of aviary drafts envisioned a depth of 4 ft. This would have involved us moving an air vent on the floor of our living room. While I liked the idea of such a deep aviary and of the ability to walk inside the aviary for cleaning, in the end I decided things would move along much faster if we didn’t need to move the air vent. That left me with a maximum depth of almost 3 ft (1 inch shy, actually). This depth would no longer allow me to comfortably walk inside the aviary, since the perches will be sticking out taking up some of that space. Plus, we had to leave some space behind the aviary for the electrical equipment to plug into the outlet there. The frame structure of the aviary would also take up space. We finally decided on an inside depth of 2.5 ft (30”) (total width greater by the thickness of the aviary frame and front). An inside width of 30” was convenient because Kraft paper is available in rolls with 30” widths and I use Kraft paper to line the floor of the aviary. The
length of the aviary was intended to run as close to the width
of our living room as we could get. The final dimensions of
the aviary were 12 ft 8 in long by 2 ft 6 in deep (plus the
thickness of the frame and front) by 7 ft high. The aviary is divided into three sections for a pleasing appearance and so that we would be able to install mesh dividers to block off any section should we need to separate birds for any reason. Shades will also divide each section to keep birds out of the section currently being cleaned. Each section contains a pair of doors that open for aviary cleaning. See Drawing 1A. Originally, we intended to build the doors ourselves and include a bottom row of "food" doors about a foot high. However, I found a cabinet door manufacturer online that would build the doors (unfinished) for us (WoodCabinetDoors.com). Because the doors are the most difficult to construct, needing mitered edges and nice joints as well as removable Plexiglas panels, we thought it was worth the expense to purchase the doors, built to our specifications (all six doors combined totalled $700.00 and shipping was free). We found it was too costly to also have feed doors built (which weren't truly necessary anyway), so the design was changed to remove these. We decided that the entire aviary would be viewed through doors rather than creating a larger stationary panel (picture window) in the center, so that we would have easy access to all areas of the aviary when cleaning. This approach limits the contiguous viewable area, however. First of all, the doors must have space in front of them to swing open - the larger the door, the more space you will need in front of it. More importantly, glass and Plexiglas panel doors are subject to "warping." When this occurs, the corners of the doors will bend outward a little, leaving a gap between the frame and the door when closed. The degree of warping is greater the larger the door. Thus, a width of greater than two feet is not really feasible. However, maintainability was my number one concern. The easier it is to clean, the easier my life will be. And more importantly, the cleaner the birds environment will be. Because the lightsmust plug into an outlet that is behind the aviary and because the aviary spans the entire length of the wall making it impossible to get behind it, I designed a small door on the back wall of the aviary that would allow us access to that outlet (Drawing 2). The aviary is designed so that mesh dividers can be installed to separate each section in case birds need to be separated. NOTE: Mesh dividers have not been necessary. There is little squabbling in the new aviary. I attribute this largely to the fact that the aviary is so large and we are careful to stay well below full capacity. Shades are installed where each section meets. The shades can be pulled down when cleaning to keep the birds out of the section I am currently working in. This makes my job easier and doesn’t stress out the birds as much. Fold-down platforms (Drawing 2) are installed no more than 1” above the floor (Drawing 4). The aviary baseboard rises another 3" above the platforms to help keep seed, husks, and debris inside the aviary. The platforms are mounted with hinges and can be folded up when not needed so that they do not collect droppings. When in use, they support the feeders and waterers and quail sand and sleep areas. The use of these platforms allows me to slide off the top layer of paper without removing the accessories that would otherwise be sitting on the floor. Because the platforms fold up on hinges, I can easily clean the floor underneath without worrying about debris and droppings collecting there. The platforms are only 1” above the floor because the quails need access to the accessories located on the platforms and the quails do not fly. NOTE: When the aviary was actually built, we decided we only needed a few of the platforms. The others could be added at a later time if a need arose. The feeding station platform was also moved from the front baseboard to the back wall in order to better keep seed hulls and debris inside the aviary. Because the birds were more likely to perch above the food if it was placed against the back wall, a Plexiglas shield was added above the feeding station to keep droppings out. Click Previous to return to the Construction section Table of Contents | Click Next to read about the Temporary Aviary |
|
Remember,
click on any photo to enlarge!
|
HOME
| CONSTRUCTION
| CARE
| BIRDS | ACCESSORIES
| BACKGROUND
AVICAM | GALLERY
| GUESTBOOK | LINKS
| SEARCH
SITE MAP | DISCLAIMER
| CONTACT US
(c)2004 FinchAviary.com